Home > Africa > South Africa > Related Images
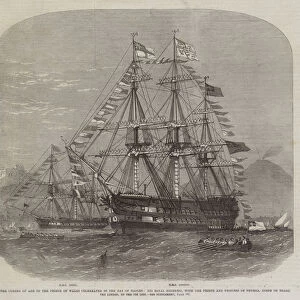
The Fight at Paardeberg, 1900

![]()
Wall Art and Photo Gifts from Heritage Images
The Fight at Paardeberg, 1900
The Fight at Paardeberg, 1900. Scene from the Second Anglo-Boer War (1899-1902) fought in what is now South Africa, between Great Britain and the independent Boer republics of the Orange Free State and the South African Republic (known as as the Transvaal by the British). The Boer general Piet Cronje (1835-1911) surrendered to Lord Roberts, the British commander-in-chief in South Africa, on 27 February 1900 after the Battle of Paardeberg. From Coloured Lantern Slides. Junior Lecturers Series. The Boer War of 1900: Chapter IV -- Cronje and Bloemfontein. [W. Butcher and Sons, London, 1900]
Heritage Images features heritage image collections
Media ID 15466392
© The Print Collector / Heritage-Images
1899 1902 2nd Boer War And Sons Battle Of Paardeberg Boer Wars Butcher Cronje Fight General Piet A Cronje Lantern Slide Piet Piet Cronje Pith Helmet Second Boer War Sons Ltd South Africa Topee W Butcher And Sons
FEATURES IN THESE COLLECTIONS
> Africa
> South Africa
> Related Images
> Historic
> Battles
> Related Images
EDITORS COMMENTS
The Fight at Paardeberg, 1900: A Glimpse into the Second Anglo-Boer War". This print captures a pivotal moment in history during the Second Anglo-Boer War. The scene depicts the Battle of Paardeberg, fought between Great Britain and the independent Boer republics in what is now South Africa. In this intense battle, General Piet Cronje, a prominent Boer leader, ultimately surrenders to Lord Roberts, the British commander-in-chief. The image showcases a group of soldiers amidst the chaos of war. Dressed in their distinctive uniforms and pith helmets, these brave men stand resolute against an unknown enemy. Their expressions reveal determination mixed with weariness from prolonged conflict. The photograph's colorized lantern slide adds vibrancy to this historical moment frozen in time. The vivid hues bring forth details that might have otherwise been lost to fading memories. As we gaze upon this print today, it serves as a reminder of the sacrifices made by both sides during this brutal conflict. It also highlights how nations clashed over territory and power in pursuit of their own interests. Let us reflect on this significant chapter from our past while honoring those who fought bravely on either side. May it inspire us to seek peaceful resolutions and cherish unity among nations for generations to come.
MADE IN THE USA
Safe Shipping with 30 Day Money Back Guarantee
FREE PERSONALISATION*
We are proud to offer a range of customisation features including Personalised Captions, Color Filters and Picture Zoom Tools
SECURE PAYMENTS
We happily accept a wide range of payment options so you can pay for the things you need in the way that is most convenient for you
* Options may vary by product and licensing agreement. Zoomed Pictures can be adjusted in the Cart.